Showing posts with label DIY Fun. Show all posts

Monday, January 12, 2015

Bedroom glam

So I have yet another Pinterest DIY project that I took on...mind you it was started and completed just days before I give birth to my 4th child! Goes to show that it doesn't take all that much effort, especially if you have a wonderful hubby helping. I get so much more satisfaction knowing I made something rather than bought it at the store and I'm pretty proud of how this project turned out. So as I'm sitting here on my couch (as I have been most of the day waiting to see if these Braxton - Hicks contractions turn into the real deal) I figured I'd post it up on the blog while it's still fresh in my head.

My hubby and I just treated ourselves to a new bed... we had our last queen sized bed since we moved in together 8 or something years ago and it was just time for a new bed after numerous moves and running out of space - two little midgets somehow manage to make their way into our room in the middle of the night. Anyway, we got a king which is huge. Haha. But we just got a simple set on a metal frame and box spring. No fancy headboard. No fancy wood sleigh frame. Just the bed. We knew we wanted to make our own headboard but wasn't sure when we would get around to it with the bambino's due date around the corner. However, the husband was not digging how boring it was looking and we took advantage of his holiday time off and my nesting plus some liquid energy (my 1 cup of coffee a day) to just get down to it.

We didn't follow any particular tutorial on Pinterest. We looked at a couple of pins and kind of planned out what we would do together. We knew we wanted a tufted look and we saw a tutorial for a headboard with some arms which I want to trim with nailheads. We got to measuring and planning - we recommend adding an extra inch to the width of the mattress measurements. We then came to an agreement on how high we wanted the headboard to go...this is completely a personal preference. I think for our king we ended up with the measurements 4 ft X 77 in. At Home Depot we had a 1/2" plywood board cut to that size. We also had several slats of 1" X  maybe 2". My husband used these to manufacture some arms for the headboard which we would bolt to the bed at the end. The rest of the supplies and how much they cost are as follows:
4' x 8' x 1/2" Plywood from Home Depot= $35
3m multi-purpose spray adhesive from Home Depot = $7
2 full size 1.5" foam mattress toppers from Target = $40
3.5 yds of batting from Walmart = $15
3.5 yds of fabric of your choice from Walmart = $8
I already had buttons and scotch guard and wood screws and staples that we used. Total only roughly $100 or so.

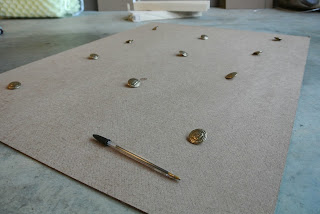
The husband started by building the legs while I took the cut board and sprayed it with adhesive to attach the foam to. I left some room on the bottom where the mattress would press up against. I also covered the legs in foam. This process is pictured below.

I gave the foam a little bit of time to fluff out since it was packaged tightly in a bag. My hubby brought the board inside so that the fabric didn't get dirty. I layered it on the carpet fabric first, then batting, then the foam covered board. I wrapped the fabric around the back of the board and stapled them down (pictured below). The corners can be tricky but I just did what I thought looked good.

The next step was to cover the arms with the batting and fabric in the same way that I covered the board, stapling them to the back of the arm so only 3 sides are fully covered. I wanted to leave the back open for when we attached the arms. Before, I did that, though, my husband meticulously measured out where the buttons would go and I put staples in their places and scotch guarded the fabric (pictured below).

My husband took over again at this point. We set the covered board face down on the bed and set the arms beside it exposed wood side up. He took some scrap 1" X 2" wood pieces from where he made the arms and screwed them into the back of the board and arms to secure them together side by side.

Lastly, I took to adding the finishing touches sewing the buttons over the staples we had measured out. The very last thing I'm going to do is add nailhead trim along the arms... but that might come a little bit later. We were too anxious not to set it up behind the bed right away. We had to see what it would look like and we were both quite pleased with ourselves. See the mostly finished product below.

This whole project took us all of 2 days, but it could be done in 1 if you already have all the materials needed. We ended up having to run out for more fabric and batting (we originally only bought 2.5 yds of each but it wasn't enough for the arms). All worth it for the end result. :)

Saturday, September 28, 2013

Avo-SPA-do

Whoa! Has it really only been 2 days since my last blog? Haha. Well, since the movers are coming to pack up my entire house in 2 days and I will be without computer, I figured I should post something to hold y'all over until we're all settled in again...or sometime thereafter.

My post on my son's truck birthday seems to be doing pretty well on Pinterest so I figured I would post another birthday-on-a-budget...this time it was my daughter's 6th birthday earlier this year (in April). Well, can you guess the theme (for those who haven't read the previous post anyway)...yep...a spa day. What girl (at any age) doesn't love some pampering? I mean, some gunk and goo on the face, glitter in your hair, and 20 different colors on all 20 nails! I honestly, don't know how much this party cost me, but I can assure you that it wasn't bad at all. In fact, this time I downsized the guest list by only inviting her closer classmates and the nearby relatives.

I think I let Lil Miss invite 6 friends to this little shindig. Most of them showed up, too. I found FREE templates for the invitations which I found on Pinterest. The setup was pretty simple. Paper plates in the girliest of colors (pink and purple), a fancy looking tray from the Dollar Store with nail polishes from my and my daughter's own collections, chargers I already had (and bought at 40% off) to display the snacks and pack of microfiber wash cloths. I also draped multiple robes (in case they didn't bring their own) on the backs of the chairs. I kept everything clean and relaxing. If I had to guess, I would say the decorations came to be give or take $10. It's a huge savings to use things you already have around the house!


The snacks were very cutesy. Like usual, I scheduled the party at an off-peak hour so I was not required to provide a full meal. The menu included pretzels, "spa" water, cookies, and marshmallow polishes. The recipe for the cookies can be found here. It was made from scratch and healthy, although it does contain peanut butter and most ingredients I already had on hand. The marshmallows were sprayed with an edible coloring and I used frosting to stick Tootsie Rolls onto the top. I probably spent less than $20 on snacks.


The activities included avocado facials, manicures, and adding glitter tinsel to their hair. I made the avocado facial because I didn't want to use anything artificial on such young faces. I can't seem to find the website I got the recipe from, but I do recall some avocado, almonds, milk, possibly some oats...I'm not quite sure. You can find tons of natural facials online, though! They all laid around on the living room floor with their hair pulled back in an elastic headband I provided with this green gunk on their faces and slices of cucumbers on their eyes. It was awesome! (Let me also say that a benefit of using natural ingredients is that they are edible as well...yes, these chicas took their cucumber slices and "dipped" it into their faces and ate it!) Once they washed that all off, we started manicures. I had the microfiber towels set on the table with the idea of warming them and wrapping their little fingers in them to soften the cuticles...buuuuut...I totally forgot with all the little girls telling hollering about which color or decal they wanted. While some got their nails did, others got tinsel tied into their hair. I found this at CVS and enlisted the help of a cosmetology student friend. They were all dazzling by the end of the party! And let's just go ahead and say I spent like $15 for these supplies.


Last, but not least are the cupcakes and thank you gifts. I made my own cupcakes at home...therefore they are not the prettiest, but I tried with the same pink spray I used on the marshmallows and purple pearl-like candies. The gifts were just $1.50 nail files and travel lotions from Bath & Body Works. Luckily, they were just coming out with some new fragrances of lotions and had mini lotions on sale for only $1 each before the release. Plus, you can often get free mini lotions with minimum purchases or 20% coupons pretty regularly so if you have a plan ahead of time, you can stock up over time. Add another $15 to my budget.


I think the girls had a great time. They were espeically amused with the facials, but they had tons of fun getting prettied up. I want to know how your spa party goes or other girly themes you come up with.

And if you've been keeping track, my grand (estimated) total for the whole party came to....drumroll please........................................................................................................................................................................................................................................................................................................................................................................................................$60! That's not bad...not bad at all even if I didn't have a bounce house or rent out a whole venue or hire a clown. :)


Thursday, September 26, 2013

Pallet Love.

That has been quite the hiatus, wouldn't you say? So much has happened since my last post (What was it even about again?). I have shut down my Mary Kay cosmetic business to focus on my true passion of photography. I have been blessed with loyal clients allowing me to photograph their children. However, I am having to say goodbye to these wonderful people as we prepare to move back across the country to Hawai'i, our home in about 2 1/2 weeks. I am not sorry to have come so far and experienced so much. Thank you to the Navy for that. But I am also thankful to be going back home...and timing couldn't be better. My family needs me right now...well, I need them a lot, too.

Well, enough about that. There is so much I have yet to post. I need to catch up on things like my daughter's 6th birthday spa party (which happened in April mind you). But today I am going to post about a project I just finished.

Lately, my husband and I have been obsessed with pallets! Just like you see all over Pinterest, pallet projects have become somewhat of a huge trend in the DIY world. Guess it has to do a lot with free wood and a lot of imagination. So far, my hubby and I have worked together on 3 pallet projects including an outdoor coffee table, a new, huge dining table, and an ottoman for the living room.

(Please excuse the terrible phone photos)

The one I'm going to post about today is the ottoman. Of course I followed a pin because I'm totally obsessed with DIY thanks to this ever-consuming go-to social media site. However, as with everything, I tried to do things just slightly different and in my own way...kind of.

I'll start with the supplies you need (the amount and cost of supplies greatly depends on how big your pallet is going to be):
 1 pallet (size of your choice) - free
 egg crate foam - $21 for a twin sized piece on sale (Joann Fabric)
 batting - $4.19/yd on sale (Joann Fabric)
 upholstery fabric - $8/yd on sale (Joann Fabric)
 fiberboard/plywood - $9 for 4' x 8' (Home Depot)
 buttons - $8.99/12 (Etsy)
 legs/top plates - $20 for 4 of each (Home Depot)
-------------------------------------------------------
My total: approximately $85.00


The first step I did was to sand down the pallet. Some thought it was kind of pointless, but my particular pallet had been sitting in some dirt in all kinds of summer rains and had some mud and splinters sticking out from everywhere. Just because it was ugly, yes, I took my hubby's sander to it and cleaned it up. The wood itself looked great once I was done. Then I measured and cut 2 pieces of fiberboard to the size of the pallet (1 for the top and 1 for the bottom). Once cut, I nailed the bottom piece on with little nails I had on hand for hanging pictures. Note: the boards are to give you a flatter surface to work with so you have something to tuft to and nail the upholstery too. You'll see what I mean as you continue. The pallet is really just a base to start your work with.


Next, I measured where my buttons would go for tufting and drilled 2 tiny holes at each spot in order for me to sew them in place.


After all of that, I took my top piece of fiberboard and and layered it on top of (in order from the bottom) the fabric, batting, and foam. I used Tacky glue (instead of spray adhesive because I had it on hand and wanted to save a little money) to glue the foam to the fiberboard. Now, keep in mind that the foam was cut to the same size as the fiberboard. The batting and fabric were both cut large enough to go down and around to the bottom of the pallet once the top is attached. The amount you need will depend on how thick your pallet and boards are.


Now, this is the hard part. The tufting. I have never tufted before and the pin that I linked to above also provides links on tufting tutorials, but I just used what I knew about sewing buttons to do the tufting. I did not purchase upholstery needles (again trying to cut costs), but they would have been really helpful as my needles didn't necessarily go through all of the materials unless squished...yes squished. It is also difficult trying to find the holes through all that material. Everything I have done up until this point was fast and fairly easy. I think it took all of an hour to do it all...but this took the rest of the night. And I called it a night once I finally got all 11 buttons on. I just sewed the buttons on as you normally would...only I pulled it tight in order to create the bulges. You definitely want to use a thick upholstery-like thread for this process. And even then you want to double it up as you sew. I had some thread on hand for sewing my husbands uniforms. It is fairly thick and did the job.


After some sleep, I got back on the horse and finished up what I started. I added more foam to each of the sides of the pallet (though I had to undo my upholstering later on once I realized that I should have added board to the open sides because you could feel it through the fabric and also add even more foam to the corners). This wasn't difficult just a pain since it was all trial and error and I didn't notice how much could actually be felt until all the fabric was already staple on. Once I had the foam surrounding all the sides, I took the tufted top and nailed it onto the pallet. From there, I turned the whole thing upside down and went to town with the staple gun. Wa-la...the top is all done.


But wait, we're not done! I took the top plates and screwed them into the bottom...OK...this is where my hubby helped me because for whatever the reason, the self started screws it came with didn't want to start for me! Anyway, I shoved them as far into the corner as I could measuring each to make sure it was equal...inside of the stapled fabric. Note: You want to trim away as much of the fabric on the bottom as you can without possibility of the fabric tearing and coming apart.


Once those were secured, I took a plain white piece of fabric I already had, nothing special and covered the entire bottom, even covering the plates I had screwed on. This hides all the ugliness and also reinforces the other materials as you are adding that many more staples and also covering up anything little children or pets can get to.


Wondering how I'm going to get the legs on? Well, I'm going to cut holes right where the legs are going to screw into the plates of course! That's what I did and they went in just fine. Get them as tight as you possibly can and you're all done!!! *Patting my shoulder now.*


Only took 2 days and I've got a new piece of furniture that is now my children's favorite place to sit and watch tv...even take naps. Haha. It's a custom piece without the custom price and the pride that you did it all yourself. As you can see we went for kind of a modern look with a vintage feel (buttons). That is what we hope to accomplish with the new house we are looking to buy when we get back to Hawai'i. I'll post more about how we decorate and other DIY projects we do to make it our own.

Enjoy making your ottoman!!! I'd love to see what you can accomplish with pallets in other ways as well!!!


Tuesday, April 9, 2013

Birthdays. Boys. Budgets.

Many of us out there are not swimming in the moola. And with multiple children, it can be very easy to get out of control with your budget...especially on birthday parties. But it doesn't have to. Now, I didn't throw a whole big bash for my one-year-old or anything, but I don't think he's going to know the difference. You don't have a huge blowout to show your children you love them. Just saying. With that said, I still feel like birthdays are a big deal and the birthday person should feel special and loved. Now, being a military family, we have had to slowly build our friend circle and it isn't huge, but this can be a blessing in disguise...I mean who wants to deal with the drama of inviting everyone you know or hurting people's feelings when they are not included because you don't have the budget to. We don't have a lot of friends who have children the same age as our youngest...he is kind of in between with the families we know. In fact, there is only one child who was within months of turning one as well. The rest of the children in attendance happened to be related to friends we wanted to spend time with.

Anyway, we invited 5-7 other families/couples/individuals and ended up with 6 children celebrating Little B's 1st birthday. And all in all, I believe I spent less than $100 for the whole party. Here's how I did it.

The whole party was based around all things wheels - cars, trucks, trains, etc. My boys love everything that goes! So, I started by gathering all of the trucks and cars I had intended on using as props, decor, etc. These were free. :)

I also made my own road signs from scrap paper I had lying around. They said things like "Dead End," "Party Ahead," "Dig In," and various arrows. I also used the same yellow paper to create road markings that I taped to a black table cover I bought at the Dollar Tree bringing my total to..............$1.00


I also made my own little orange cones from construction paper. I didn't have any orange paper so I did indeed have to buy some from Michael's, but I used a 40% coupon making it maybe $2.00 or so. But I'm not going to count this toward my party budget mostly because I only used a handful of sheets from this multi-pack that will be used for scrapbooking and other crafts. These were used to decorate the main table and were stuffed with the favors I handed out at the end of the party. The favors included cheese/cracker snacks ($2.00), tattoos ($2.00), puzzles ($4.00), and mini cars ($2.00). This brings my total to about $11.00.


At the age of 1, there isn't a whole lot of party activities that they can take part in. That made things easy. I gathered a bunch of car-themed items I found around the house - wooden puzzles, books, matchbox cars, etc. I layed them out on a mini table (excuse the sticker-covered Dora set I borrowed from my daughter) with seats. I also bought several wooden cars/trucks from AC Moore craft store and provided crayons for them to decorate. These were a $1 each totaling $8.00. Now, my budget comes to $19.00 and we're more than half way ready for the party!!

The food is where parties can get expensive. That's why I plan my birthday parties at off-prime meal times like 2pm. That way, guests should have already eaten lunch, but will not yet be ready for dinner by the end of the party. I only have to provide some refreshments/finger foods. On this day, the menu included a case of water ($3.00), soda (less than $3.00), pretzels ($3.00), a cheese bread bake with fruits ($12.00), veggie straws ($3.00), and cake ($0.00)! A friend offered to make some cake pops in traffic light colors decorated with some of the boys' car and truck toys! We also had a few adult drinks that cost somewhere between ($15-20.00). That brings us to a total of about $63.00. I have to note that I found a super cute snack idea on Pinterest using apple slices and grapes. Basically, I cut the grapes in half and using a toothpick, I attached 2 halves on either side of the apple slice to make it look like cars! Check out the picture below.


The only items I have left out so far are balloons (which I hung from the ceiling instead of having them blown up with helium) and other very minor decorative items that cost about $3.00 and the invitations which were maybe $10. Final cost = $76.00. How amazing is that?!!! It was a relaxing time where I could focus on my guests and the birthday boy and it seemed like we all had a great time. Here is the final set up of the heart of the party. :)


P.S. Stay tuned for a budget-friendly spa party for my daughter taking place in just a couple short weeks.