All moms are critical of each other. Even if we say we aren't judging or don't mean to, we still have an opinion about others' parenting. One of the biggest debates are that of MWOH (mothers working outside the home...I could very well have just made that acronym up) vs. SAHM (the stay at home mom). I have been on both sides of this one and that is where my opinion on the matter comes into play.
When I had my first child I was going to school and work. Once I graduated I went to work full time and shortly after that I became a SAHM. My reasons for becoming a stay at home mom were practical...for the most part. My husband was scheduled to go out to sea for an extended period and to me, it just didn't seem fair to my daughter. I wanted to be able to give her all of my attention and to make up for his absence. I also figured it would be difficult to shuffle her around to daycare and from daycare while fighting to get everywhere on time. So that started my approximately 5 year stint as a full time mom.
Now that I have 3 children and are back "home" from our duty station in Connecticut, I figured it was time to go back to work. This was mostly fueled by my need to have mom time as well as the need to feel like I contribute more to my family.
With that being said, I want to say that both have its pros and cons. As a SAHM I loved being available and flexible to my children on a regular basis. However, being around my children literally 24/7 was rough. I never felt like I had a break from working. I love them all to pieces as is politically correct to say. However, they are certainly a handful and as I've said once, twice, a million times before, it is important to take care of yourself and have some mom time so you can appreciate the time with your children that much more. As a SAHM I hated the stigma that I didn't do anything all day. I was also tired of being judged for not having a house that was spotless and everything in its place. That was annoying as heck. The truth of the matter is that I tried to have fun with the kids while also following them around the house picking up the tornados they created. It was a vicious circle. All the while, I had to try to keep the household running with bills, chores, shopping (and I'm not just talking retail here). To top it off, I felt like I couldn't make any of the larger family decisions - which car we should purchase, which house to rent, etc. I wasn't making any of the money so what gives me the right to say it's OK to spend such a large amount on a single thing.
As a working mom I love that I have a separate life than that revolved around my 3 little minions. I feel like there is more depth to me and I feel like I'm a better mom to the children because I miss them when I am away from home and I have a little more patience with them. On the other hand, it is certainly a balancing act. I struggle to get to my kids' daycare before they close after work and I have no energy to make them a home cooked meal or to check homework and bathe them before bed. I appreciate that I'm bringing home a paycheck, but in all honesty I'm certainly not going to make it rich because childcare eats up 50-75% of that money. Most of the negative stigma toward MWOH is that they are not the ones raising their children and/or that they have no time for anything besides work and children.
Therefore, my opinion alone, is that being a mom is not easy whether you are at home with your children or working outside the home. We do what we need to out of necessity. Moms who are home with their children cherish that time with them and are doing their best to raise them the best way they know how. And these moms should never feel like they do not have a say in the important family decisions because raising your children is a huge contribution to the family. And not all moms have the pleasure of choosing to stay home with their children. This is not a bad thing...they are providing a certain lifestyle for their family and are likely doing a better job parenting then if they were overly stressed and frustrated with being at home all day. It doesn't make you a terrible parent for feeling like you need a break from your kids or wanting to strangle them every now and again.
Whether you are a good or bad parent has nothing to do with your "job" and has everything to do with what you do with the moments that count. Do you make every effort to go to your children's sporting events or school plays? Do you listen to your children and show an interest in their interests? Do you snuggle with them every chance you get and are you paving the way for a happy, healthy, successful life for them? Even though we are ultimately going to judge others for their parenting whether it be outspoken or subconscious, keep in mind that you can't possibly know everyone's story. We are all a band of mothers and should help each other out and stand by each other.

For moms like you and me: glamorous, devoted, capable, and fabulous
Showing posts with label 3 Kids and A Dog. Show all posts
Showing posts with label 3 Kids and A Dog. Show all posts
Saturday, March 15, 2014
Sunday, January 19, 2014
Outlet Quickie
Holy Hello! It is 2014!! I know it has been ages since I last wrote a post, but I'm too afraid to actually look at the date. :/ Well, with the new year, I need to resolve to be better...even though I'm busier then ever this year. All 3 of my little minions are enrolled in school/daycare so that I could go back to work. My oldest is going to be starting soccer next month. The husband transferred to a new command that will be keeping him away from home a little more than our last station and I'm going to start trying to get back to running my business now that we've moved and kind of settled in.
But I'm going to try to focus my posts more on deals that I've been finding lately because amidst all the chaos, I find the most joy in taking some time for myself for a massage (which I recently found on Groupon for almost half the price and a longer session), occasionally heading to the neighborhood gym before picking up the kids, and of course, going shopping. But I very very very rarely ever buy anything full price. I have an app for that...if I don't already have a coupon. Some of my favorite retailers that offer great coupons are Bath and Body Works, Gap [Outlet] and Target. But then there are also the few occasions where you feel you deserve to treat yourself to a special something...like say a new Michael Kors bag or something of the sort. Well, I haven't found a decent deal for that specific handbag retailer since Christmas, but I did head out to the outlets today with my kids in tow and met my girlfriend for a mini retail experience.
We ended up going to Michael Kors (I exited empty handed and a sad face), but I did find a couple of deals going on at Gymboree Outlet and the Converse Outlet. Because most stores are currently moving their winter stock out for the Spring collections, you can easily find a bunch of pants, jackets, and long sleeves on sale for great prices! At Gymboree, they had roundabouts full of pants and long sleeve tshirts with a sign on top saying $5.99 and under - Discount taken at register. I picked up a pair of pants for my boys a size big for $5.99, original outlet price $22.99. Also Gymboree, much like almost ALL of the outlet stores at this location, was offering a BOGO (Buy One Get One) 50% off sale on all regular priced items. I found tshirts for 2 of my children from the new Spring lines each valued at $14.99. For the 3 items I paid roughly $21. Not bad considering the regular price of the pants alone were that much.
After that we hit up Converse. Every kid needs a good pair of Chucks...mine have several...lucky little boogers. Most of them were gifted and handed down to them from friends. On the plus side, much of their sneakers are gender neutral so even though my girlfriend has 3 boys, my daughter can benefit from their mother's shoe addiction. Hahaha. Anyway, Converse was also having a BOGO Half Off sale, but it was on everything in store, including sale items. My daughter needed a pair of shoes seeing as her feet have grown the diameter of a nickel in a few short months. She got a pair of classic Chucks in pink.
She's seen her posing with my girlfriend...the one with the shoe addiction. :p
Since there was a BOGO sale going on, I figured my boys could use a pair as well. I got one big enough for my older son to wear and we can make the most of our money by then passing it on to the youngest. For 2 pairs, I paid $29. The boys' shoes were originally marked $37.00. I didn't catch the original cost of the pink shoes because my daughter insisted on wearing hers as soon as we left the store.
Other outlet stores that I noticed were having good sales were the following:
Nine West: $14.99 sale (they do this fairly often) as well as BOGO Half Off
Michael Kors: Additional 50% off clearance purses
Guess Factory: I noticed a table of marked down items but I did not go into the store
Skechers: BOGO Half off although what I paid at Converse for 2 pairs cost barely more than 1 pair here
Oshkosh B'gosh: Winter clothes marked down $5.99 or less
Go check out your outlet mall this weekend. Many stores offer great discounts for long holiday weekends. It's a great time to stock up on winter essentials for the future.
Saturday, September 28, 2013
Avo-SPA-do
Whoa! Has it really only been 2 days since my last blog? Haha. Well, since the movers are coming to pack up my entire house in 2 days and I will be without computer, I figured I should post something to hold y'all over until we're all settled in again...or sometime thereafter.
My post on my son's truck birthday seems to be doing pretty well on Pinterest so I figured I would post another birthday-on-a-budget...this time it was my daughter's 6th birthday earlier this year (in April). Well, can you guess the theme (for those who haven't read the previous post anyway)...yep...a spa day. What girl (at any age) doesn't love some pampering? I mean, some gunk and goo on the face, glitter in your hair, and 20 different colors on all 20 nails! I honestly, don't know how much this party cost me, but I can assure you that it wasn't bad at all. In fact, this time I downsized the guest list by only inviting her closer classmates and the nearby relatives.
I think I let Lil Miss invite 6 friends to this little shindig. Most of them showed up, too. I found FREE templates for the invitations which I found on Pinterest. The setup was pretty simple. Paper plates in the girliest of colors (pink and purple), a fancy looking tray from the Dollar Store with nail polishes from my and my daughter's own collections, chargers I already had (and bought at 40% off) to display the snacks and pack of microfiber wash cloths. I also draped multiple robes (in case they didn't bring their own) on the backs of the chairs. I kept everything clean and relaxing. If I had to guess, I would say the decorations came to be give or take $10. It's a huge savings to use things you already have around the house!


The snacks were very cutesy. Like usual, I scheduled the party at an off-peak hour so I was not required to provide a full meal. The menu included pretzels, "spa" water, cookies, and marshmallow polishes. The recipe for the cookies can be found here. It was made from scratch and healthy, although it does contain peanut butter and most ingredients I already had on hand. The marshmallows were sprayed with an edible coloring and I used frosting to stick Tootsie Rolls onto the top. I probably spent less than $20 on snacks.

The activities included avocado facials, manicures, and adding glitter tinsel to their hair. I made the avocado facial because I didn't want to use anything artificial on such young faces. I can't seem to find the website I got the recipe from, but I do recall some avocado, almonds, milk, possibly some oats...I'm not quite sure. You can find tons of natural facials online, though! They all laid around on the living room floor with their hair pulled back in an elastic headband I provided with this green gunk on their faces and slices of cucumbers on their eyes. It was awesome! (Let me also say that a benefit of using natural ingredients is that they are edible as well...yes, these chicas took their cucumber slices and "dipped" it into their faces and ate it!) Once they washed that all off, we started manicures. I had the microfiber towels set on the table with the idea of warming them and wrapping their little fingers in them to soften the cuticles...buuuuut...I totally forgot with all the little girls telling hollering about which color or decal they wanted. While some got their nails did, others got tinsel tied into their hair. I found this at CVS and enlisted the help of a cosmetology student friend. They were all dazzling by the end of the party! And let's just go ahead and say I spent like $15 for these supplies.


Last, but not least are the cupcakes and thank you gifts. I made my own cupcakes at home...therefore they are not the prettiest, but I tried with the same pink spray I used on the marshmallows and purple pearl-like candies. The gifts were just $1.50 nail files and travel lotions from Bath & Body Works. Luckily, they were just coming out with some new fragrances of lotions and had mini lotions on sale for only $1 each before the release. Plus, you can often get free mini lotions with minimum purchases or 20% coupons pretty regularly so if you have a plan ahead of time, you can stock up over time. Add another $15 to my budget.


I think the girls had a great time. They were espeically amused with the facials, but they had tons of fun getting prettied up. I want to know how your spa party goes or other girly themes you come up with.
And if you've been keeping track, my grand (estimated) total for the whole party came to....drumroll please........................................................................................................................................................................................................................................................................................................................................................................................................$60! That's not bad...not bad at all even if I didn't have a bounce house or rent out a whole venue or hire a clown. :)
Tuesday, April 9, 2013
Birthdays. Boys. Budgets.
Many of us out there are not swimming in the moola. And with multiple children, it can be very easy to get out of control with your budget...especially on birthday parties. But it doesn't have to. Now, I didn't throw a whole big bash for my one-year-old or anything, but I don't think he's going to know the difference. You don't have a huge blowout to show your children you love them. Just saying. With that said, I still feel like birthdays are a big deal and the birthday person should feel special and loved. Now, being a military family, we have had to slowly build our friend circle and it isn't huge, but this can be a blessing in disguise...I mean who wants to deal with the drama of inviting everyone you know or hurting people's feelings when they are not included because you don't have the budget to. We don't have a lot of friends who have children the same age as our youngest...he is kind of in between with the families we know. In fact, there is only one child who was within months of turning one as well. The rest of the children in attendance happened to be related to friends we wanted to spend time with.
Anyway, we invited 5-7 other families/couples/individuals and ended up with 6 children celebrating Little B's 1st birthday. And all in all, I believe I spent less than $100 for the whole party. Here's how I did it.
The whole party was based around all things wheels - cars, trucks, trains, etc. My boys love everything that goes! So, I started by gathering all of the trucks and cars I had intended on using as props, decor, etc. These were free. :)

I also made my own road signs from scrap paper I had lying around. They said things like "Dead End," "Party Ahead," "Dig In," and various arrows. I also used the same yellow paper to create road markings that I taped to a black table cover I bought at the Dollar Tree bringing my total to..............$1.00

I also made my own little orange cones from construction paper. I didn't have any orange paper so I did indeed have to buy some from Michael's, but I used a 40% coupon making it maybe $2.00 or so. But I'm not going to count this toward my party budget mostly because I only used a handful of sheets from this multi-pack that will be used for scrapbooking and other crafts. These were used to decorate the main table and were stuffed with the favors I handed out at the end of the party. The favors included cheese/cracker snacks ($2.00), tattoos ($2.00), puzzles ($4.00), and mini cars ($2.00). This brings my total to about $11.00.


At the age of 1, there isn't a whole lot of party activities that they can take part in. That made things easy. I gathered a bunch of car-themed items I found around the house - wooden puzzles, books, matchbox cars, etc. I layed them out on a mini table (excuse the sticker-covered Dora set I borrowed from my daughter) with seats. I also bought several wooden cars/trucks from AC Moore craft store and provided crayons for them to decorate. These were a $1 each totaling $8.00. Now, my budget comes to $19.00 and we're more than half way ready for the party!!


The food is where parties can get expensive. That's why I plan my birthday parties at off-prime meal times like 2pm. That way, guests should have already eaten lunch, but will not yet be ready for dinner by the end of the party. I only have to provide some refreshments/finger foods. On this day, the menu included a case of water ($3.00), soda (less than $3.00), pretzels ($3.00), a cheese bread bake with fruits ($12.00), veggie straws ($3.00), and cake ($0.00)! A friend offered to make some cake pops in traffic light colors decorated with some of the boys' car and truck toys! We also had a few adult drinks that cost somewhere between ($15-20.00). That brings us to a total of about $63.00. I have to note that I found a super cute snack idea on Pinterest using apple slices and grapes. Basically, I cut the grapes in half and using a toothpick, I attached 2 halves on either side of the apple slice to make it look like cars! Check out the picture below.


The only items I have left out so far are balloons (which I hung from the ceiling instead of having them blown up with helium) and other very minor decorative items that cost about $3.00 and the invitations which were maybe $10. Final cost = $76.00. How amazing is that?!!! It was a relaxing time where I could focus on my guests and the birthday boy and it seemed like we all had a great time. Here is the final set up of the heart of the party. :)

P.S. Stay tuned for a budget-friendly spa party for my daughter taking place in just a couple short weeks.
Wednesday, December 12, 2012
Save the Knees!!!
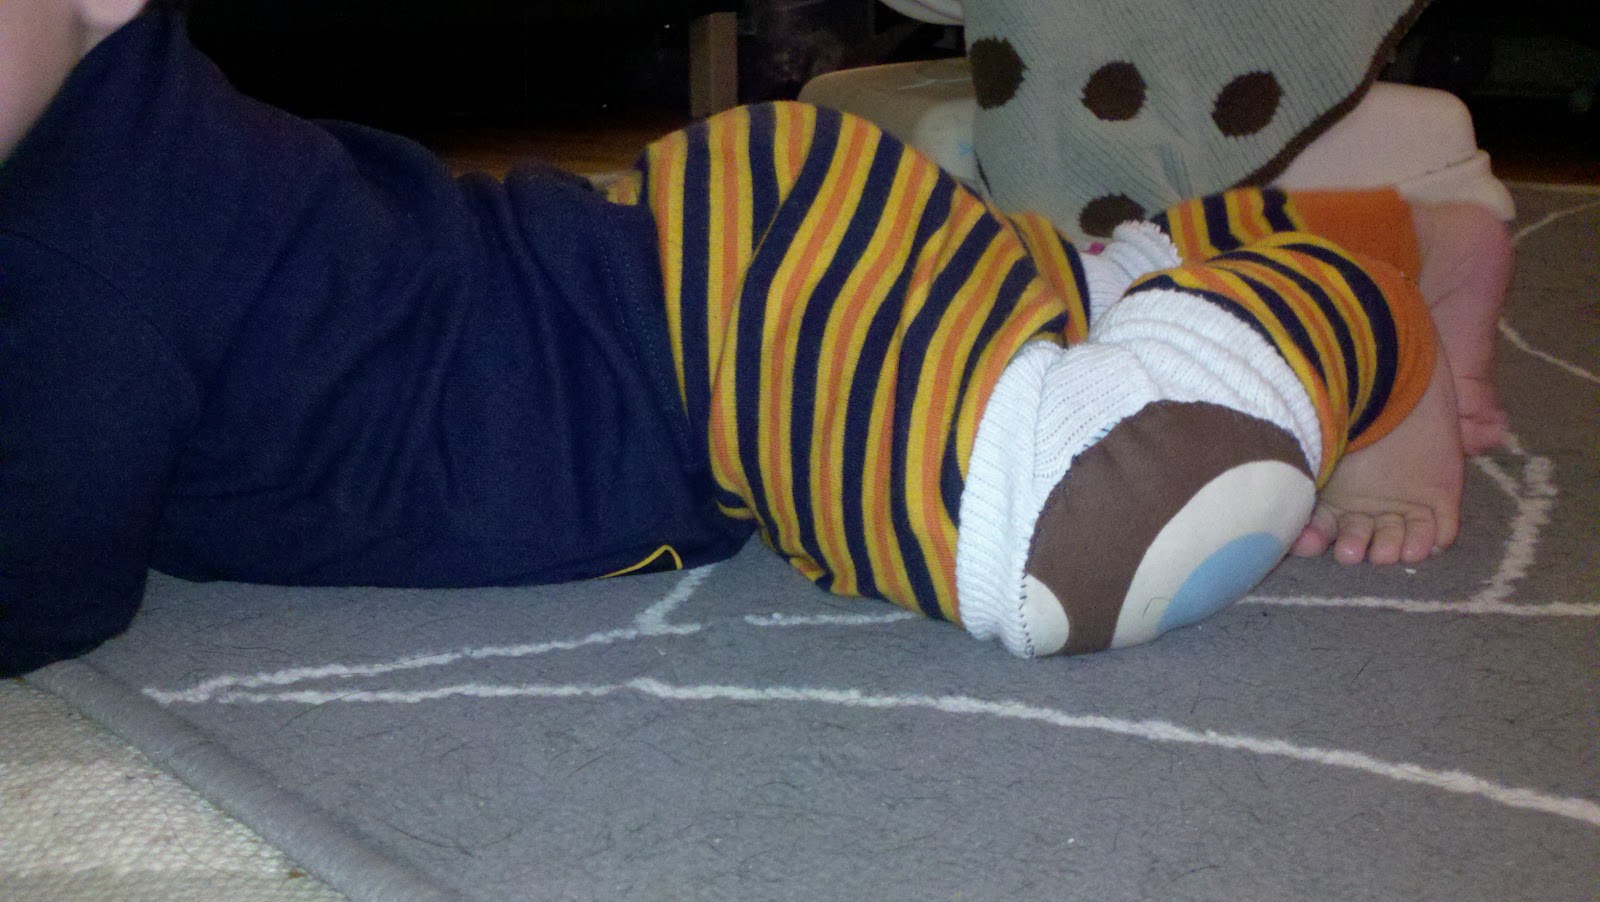
Man, I think it's been a while. Well, I'm here now and that's what matters, right? Hope you missed me. Lol. Anyway, tonight I'm posting about another DIY craft I did. My youngest is almost 10 months young and well, he's on the move...and fast. I don't know how this happened. One minute he was idle and cried every time he wanted to move. He didn't like being on his belly for very long...he even refused to roll over from his back onto his belly, but had no problem going the other way around. I know, I know. Every mother says that time flies and kids grow up too fast. But seriously...I don't know how this happened. And as if this wasn't bad enough, he's sprouted 4 teeth. What the what? I am not happy about this. And quite frankly, neither are his knees. They were starting to get red and full of scratches. :( Therefore, all of this recent activity has sparked a craft project!!
Sure, you can purchase knee bads online or what have you...but really, why bother when this stage is only going to last a few mere months? So, I got to thinking and researching online for DIY knee pads. I didn't care for much of what I saw online, so I decided to take a few different ideas and a couple of my own and put together my own little thing. It was rather simple. All it requires is a pair of old tube socks, reusable nursing pads (just in case you find the need to wash them you don't want to use disposable pads), fabric scraps, needle and thread. I kindly asked the hubby for a pair of old socks (he would only give a pair of plain ol' white ones...not the cute stripedy ones) and since I recently finished nursing, I collected a pair of my old reusable boobie pads. And I have some scrap fabric laying around from old projects I did. You can find some at your local fabric store or by about a pound on Etsy for about $5-$10 depending on the quality/brand of the fabric. But you really are only going to use about 2-3"x3" squares. And this is what I did.

The first step was to wrap the fabric over one side of the pads and using a simple hand stitch, secured it to the pad. This is just going to add a little bit of comfort and padding to baby's poor little knees.


Then I cut the tube off the socks and to keep it from fraying, I "hemmed" the side I cut.


The next step was to attach the fabric-covered pad to the sock. Again, all of this sewing really requires the simplest of stitches. Whatever you think works best. I also doubled up on the thread just to increase durability. Ta-Da! You've got knee pads for your little one to move about wherever he wants. If only I could create a DIY invisible baby gate to go around the Christmas tree!!!


Hope you have fun saving your baby's knees!!! Stay warm!

P.S. These photos were taken with my awesomely bad camera phone!!!
Sure, you can purchase knee bads online or what have you...but really, why bother when this stage is only going to last a few mere months? So, I got to thinking and researching online for DIY knee pads. I didn't care for much of what I saw online, so I decided to take a few different ideas and a couple of my own and put together my own little thing. It was rather simple. All it requires is a pair of old tube socks, reusable nursing pads (just in case you find the need to wash them you don't want to use disposable pads), fabric scraps, needle and thread. I kindly asked the hubby for a pair of old socks (he would only give a pair of plain ol' white ones...not the cute stripedy ones) and since I recently finished nursing, I collected a pair of my old reusable boobie pads. And I have some scrap fabric laying around from old projects I did. You can find some at your local fabric store or by about a pound on Etsy for about $5-$10 depending on the quality/brand of the fabric. But you really are only going to use about 2-3"x3" squares. And this is what I did.

The first step was to wrap the fabric over one side of the pads and using a simple hand stitch, secured it to the pad. This is just going to add a little bit of comfort and padding to baby's poor little knees.


Then I cut the tube off the socks and to keep it from fraying, I "hemmed" the side I cut.


The next step was to attach the fabric-covered pad to the sock. Again, all of this sewing really requires the simplest of stitches. Whatever you think works best. I also doubled up on the thread just to increase durability. Ta-Da! You've got knee pads for your little one to move about wherever he wants. If only I could create a DIY invisible baby gate to go around the Christmas tree!!!


Hope you have fun saving your baby's knees!!! Stay warm!
P.S. These photos were taken with my awesomely bad camera phone!!!
Tuesday, November 20, 2012
All Aboard!
As you know, I put together a train themed birthday party for my son who just turned 2. He had a great time. It was intimate in our home with few family and friends - we had originally requested the neighborhood community center and were pretty upset to find another party going on there...oh overbooking. Anyway, just about everything I put together was handmade. Take a look at the fun, however please excuse the photos themselves. I was a bit distracted by the party that the pictures are really subpar. I was a bit scatter brained and couldn't figure out the lighting for the life of me!!
I ordered the invitations off of Etsy. I also made all of the snacks that were served including Pizza Bites, Apple Chips, Candied Popcorn, and Chips and Salsa for the adults. The snacks were labeled and served aboard a train constructed by the hubby and I from cardboard boxes and wrapping paper. The drinks consisted of bottled water (labeled Steam Water) and chocolate milk (labeled Fuel) - all labels were made by myself and were super easy...just print out the words in your favorite font, cut them out and glue to layers of scrap paper.


The décor was really simple as well. It consisted of balloons and railroad tracks (electrical tape) leading to the front door. A "Happy Birthday" sign that we reuse every celebration and more balloons.

Since my son is only 2 (even if most of his guests were over that age), the activities were pretty limited, but still maintained a decent flow throughout the party. I passed out favors at the beginning of the party including a conductor's hat, a wooden train whistle (both ordered off of Amazon) and Chuggington coloring pages with molded crayons I made. They had a great time snacking and blowing their whistles for the first half hour-ish. Luckily we were at home and had the availability of my kids' toys. They started playing with cars, trains, dinosaurs, books and more right here in the living room where parents could keep an eye on their kids. And all of them got along great! They were playing well together and sharing and talking and laughing. It was amazing. Another simple activity I had lined up was a Silly Photo Booth. You can buy prepackaged props from Wal-Mart - the one that I got was in the party section and included a plastic background and face props (mustaches, hats, lips, glasses, etc.) And before a lull could make its way into the party, I brought out a cardboard box my husband had transformed into a train with windows (luckily we had just received our new couch in this very large box) and the kids colored away on it. :)


The reoccurring theme of the party is that it was simple, but fun. Nothing too extravagant and beyond my means...we saved a lot of money by making things ourselves (we probably spent on the lower end of somewhere between $100-200). This was all for 6 children and 10 adults.
For my son's 2 year portraits, check out my photography blog at Happy Child Images. :)
If I don't get a chance to post before Thursday, Happy Turkey Day to you!!!
Wednesday, November 14, 2012
Fabulosity On A Dime
Hope everyone is having a great morning so far. My littlest lil' man and I are hanging out with one eye on the Today Show as we do every morning. Yesterday, I caught a segment talking about a new trend in shopping for baby clothes...borrowing or renting children's clothes. They estimate that we spend $13,000 a year on kids' supplies and this is one way to save a little bit of that. Our children grow out of their clothes so quickly that it seems we are constantly having to buy them new socks or new jeans or new shoes. Well, as I saw on TV yesterday morning, there are sites online that you can rent children's clothes from.
Borrow Baby Couture offers the opportunity to rent high end brand name clothes like Dior and Versace for children 9 months to 4 years for a small weekly fee. Shop online and the kiddie couture gets sent right to your door. Once returned, the company themselves have each item professionally cleaned so you don't have to worry about small accidents. Most items are special occasion items, but can also be outfitted for slightly less fancy moments. BBC was started by a couple who realized their son would never use the suit they purchased for a wedding a second time and figured there were other parents out there who could benefit from borrowing these one-time-use outfits for a fraction of the retail prices.
The segment also mentioned an online consignment website called Moxiejean.com. Here you can buy and sell gently used clothing for minimal cost. They offer clothes for Preemies up to 8 years old. Click here to get $10 off of $20 and share the site with your friends in order to save even more.
I had heard about consignment before, though I wasn't clear on the details of how it worked until I had my 2nd child 2 years ago and came across a couple of consignment stores in my area. You can find some really cute and unique items at these types of shops, but you can also find your everyday play clothes made by Carter's and other well known child clothing companies. The closest consignment boutique to me doesn't always have the types of clothes that appeal to me so I'm pretty excited to have found an online option as well.
I am not going to sugar coat it. I am a self-proclaimed "Brand Whore," but I am also a "Discount Diva." "Full price" is almost considered a swear word while the word "Sale" is kind of a turn on. Hahaha. I would prefer an item that is brand new that no other person has ever worn, but quite frankly kids are kids. They grow out of their clothes way too fast for me to keep buying brand new...especially now that we have 3 little youngins and I'm looking to close up my Mary Kay business by the end of the year. There is a new invention out there called a washing machine and laundry detergent, so I think I can manage a few not so brand new pieces without having a cow, but I will be picky about the things that I purchase from these types of stores. And besides, you can make a little money back on those clothes your child has outgrown to purchase bigger sizes they will need.
I might also point out that you can do a search on Facebook for sites that recycle children's clothes and toys, etc in your area. I know of several groups I am a member of on FB where I've bought gently used toys and sold gently used clothes to other local moms. It's like an online yard sale.
These are all great ways to save money and help save the planet. Don't forget that you can also donate your items to places like Goodwill and the Red Cross for those who have been affected by natural disasters. Hope you'll think about it. You can still be fabulous. Items may not be brand new but you can make them brand new to you!
Have a great day!
Tuesday, November 6, 2012
A Deal That's Hard To Resist
Alright...this is kind of too good not to share! For all you new momma's and expecting momma's or ladies who know expecting or new momma's or those who are looking for a gift for new or expecting momma's this is just for you!!! So, my daughter's school sends home the Scholastic Parent & Child magazine regularly and I came across the page that offers great new items for kids. I've seen it in several different issues of P&C as well as Parenting magazine. There is an offer listed for a FREE car seat canopy from carseatcanopy.com with offer code PC11. It is originally $49.95 for free, but you will be charged shipping of $12.90. I think it's still a pretty good deal. Shipping is kind of pricey, but I think of it more like the canopy itself costing $12.90 in the store. They have some great prints and you have to hurry and get yours because many are backordered for a couple weeks to a month. You want to get it before it starts snowing (if you're in an area that snows). It will be great for protecting baby from the rain as well. And once you place the order, check the confirmation page for codes to use for a free nursing cover and baby sling carrier. Get going! Now!! GO!!!
 Enjoy!

Thursday, November 1, 2012
Tricks for Treats
Well, I hope everyone had a happy and safe Halloween. We had a nice time with our three little munchkins despite possible cancellation. Many towns and cities in our state have cancelled or postponed Halloween as a result of Hurricane Sandy, but luckily our particular neighborhood felt very little effects...however, if you drove 20 minutes in either direction, you could come about many downed trees and debris that washed ashore from the high ocean surges and some homes with damage along the shore. We lucked out, thankfully, and Halloween went on. One of my children still hasn't been back to school, but all 3 participated in events at the preschool my son attends. We also went to a trunk-or-treat at the community center and did some door-to-door trick-or-treating nearby. This year, I opted for a few DIY projects instead of spending a butt load of money on costumes and treats. And I was rather pleased with the effort and savings.
Since my son still had school (and I'm still planning on sending treats with my daughter once she goes back to school), I decided to put together little treat bags for the children and their classmates. I bought two of those large tubs of cheese balls.They are light and tasty and it's a little different from your typical candy treats. I already had little clear baggies and made my own labels on Photoshop Elements that I just printed out here at home. The end result was 40 bags of Pumpkin Poop. Total cost just over $10.

Kind of at the last minute, I also decided to search for a costume for the baby. I wasn't sure I wanted to spend too much money on it seeing as he can't even go trick-or-treating or was even really seen by anyone since he slept in his stroller as we walked around, but it is his very first Halloween and I just felt guilty about not doing a little something. I searched online for costumes on sale at the last minute and decided to search for DIY options as well. I came across the cutest thing I had ever seen - a sushi! Luckily I had a white onesie that barely even fits the poor kid anymore and an orange one that definitely doesn't fit him anymore. I found a stencil for a shrimp from Martha Stewart and instead of just doing a 1-dimensional felt shrimp, I sewed together 2 pieces of the template and stuffed it with some pillow fluff I already had making a super cute 3D version from the old orange outfit. My husband also had some black Gorilla Tape lying around so he helped me make a "belt" out of it to act as the nori. I also had some green felt from previous projects that I cut up to look like the green plastic stuff that they use to separate the sushi from the ginger and wasabi in bentos. It didn't cost me anything since I used stuff I already had around the house and this was my end result:

He looks good enough to eat!!! Finally, I came across a purple witch costume on Pinterest and it dawned on me that 1) my daughter looooves the color purple, 2) I had purchased a purple witch's broom on clearance last Halloween and 3) we already had a good amount of the attire that was pictured (black and white striped leggings, a black top, and purple tutu). All we had to buy was a hat and we found a cute purple witch's hat headband and put everything together. We added a second sheer black tutu for a little extra body and she had some purple boots (not quite the same color purple as the rest of her costume, but whatever...she didn't really care). Her costume ended up being about $10 as well. The only store bought costume we actually did buy was for my other son. We went with a monster from Old Navy, which turned out to be fitting since he was introduced to and fell in love with Monsters, Inc. the movie.

So easy and so fun...we had a great time. Just thought I'd share our little tricks for treats. I'm feeling rather Martha Stewart-esque! :) Hope everyone out there in the blog world did and were safe as well!
Happy November!!
Subscribe to:
Posts (Atom)